Sunday, October 17, 2010

Painted sprockets and brake assembly

I painted my rear wheel sprocket, brake assembly and my engine gear sprocket. 
I'm going to reassemble the rear wheel tomorrow after the paint has had time to completely dry
I'm sure it's not going to last long but it's worth a shot.


Saturday, October 16, 2010

Installed Wheel Bearings

These went in pretty easily a lot faster then getting the old ones out. I laid the bearings flush and gave it a whack with a rubber malled.  

Bearing 1
Bearing 2
Side note: I noticed I didn't have the bearing in far enough after
I took this picture. Make sure your bearing is pressed in far enough.


Don't forget the spacer between the bearings 

Rebuilding Idle Sprocket

I rebuilt my idle sprocket last night, it went pretty well. I cleaned the bearings, sprocket, and the gear stopper thing. I'm not sure what they are called but it's the little pieces that stops the sprocket from moving backwards. 
bearings, springs, and gear stoppers soaking in carb cleaner

Back side of Idle Sprocket with clean bearings packed in new grease
Once all the bearings are greased up it should be pretty easy to flip the
sprocket over  with out losing any bearings
I'm not sure what these are called but they seem to hold down the
clips that stop the sprocket from moving backwards and the screw cap.
Installing the clip things I was just referring to
and now the 3 ring covers
Installing the clean bearings and grease on the front side over the sprocket
All the bearings installed
Adding grease to the screw cap


After that I screwed the cap on (counter clock wise) and tapped it tight then spun it around a couple dozen times and wiped all the excess grease that seeped out. 

Thursday, October 14, 2010

Engine Bearings Version 2.0


If you recall I attempted to install my crank bearings a couple weeks ago with little success. Every time I started cranking the bearing down it would start to get a little crooked and get stuck. Now with a second pair of hands and a handy Emeralds Peanuts container they went on with no problem.


A preview of our rig


Bill approving our setup after 
success of  the first bearing.


Image of  both bearings sitting nicely on the crank


Snap ring install


Both bearings and seals and clutch bushing
 installed. that went really well. 


Next I'm going to clean the clutch bell and probably replace the springs and continue the engine build

Rear Wheel Bearings

WARNING! 
DO NOT SANDBLAST & POWDER COAT YOUR WHEEL WITH THE BEARINGS  INSTALLED

Now that I got that warning out of the way. let me show you some pictures of what happens when you don't listen to my warning. 

I spent a good couple hours trying to bang out these bearings and  I had to finally call in a friend (Thanks Bill) to help me hit it a bit harder. 


This is the bearing still stuck in the wheel. 
If you look closely you can see my stuck punch    


This is what my bearing looked like after I got it out


Here are the two little bastards 
that gave me so much crap


A picture of Bill trying to figure out why they put  plastic/rubber  pieces  on the end of the  bearing spacer. 


Here is the piece i was referring to,  I kinda chipped the right side of  the spacer. I'm not sure if the other side had the rubber plastic caps. I'm going to figure that out today. 


The wheel is ready to be cleaned 
and prepped for the new bearings.


Oh yea, this is a picture of my punch that was stuck in the bearing. I now know why I couldn't pull out the punch. I'm pretty sure it was straight when I put it in there. 

Reassembling Front Wheel

Well I got the front wheel reassembled, I think i need to do some fine tuning on the bearing pressure.


I had to go to Auto Zone and buy a cheap wrench to grind down to make my
own tool to tighten the set nut on the wheel.  This is a much cheaper alternative to
buying a special wrench.

Monday, September 13, 2010

Cleaned my front wheel bearings and races

Well I finally got back to the front wheel. I cleaned out the bearing races with a q-tip and some carburetor and below is a picture of my bearings soaking is some carburetor cleaner in my blaster cap (one more use for blaster http://www.pbblaster.com/).  
Bearings Soaking In Carburetor Cleaner

Before
After


Before
After


Before
After


Monday, September 6, 2010

Removing Front Wheel Bearings


Last night I removed the brake assembly and the bearings, it was a bit tough. I'm going to clean them today and go pick up some new grease to pack them with. Thanx to my wife i didn't loose any bearings.

It looks like i might need a special tool to get the rear wheel bearings out. I'll do some research today and hopefully get those out tonight.


Failed attempt at installing new bearings


Well i'm using the freeze and heat method.
Here is my crank getting nice and cold


Here are my bearings cooking.
I don't think I got them hot enough
I had them in the oven for 10 mins at 200 including preheating. so really they were only in there for around 8 mins at 200 degrees
This is as far as i got :(
not really a success
So i went out and bought a bearing puller and a clutch puller while i was out.
I found out from the moped army that there is a way to press the bearings on with the puller so that is what i'm going to try next time. I think i'm going to take a break from these bearings and try my hand at the wheel bearings :).

Tuesday, August 31, 2010

Parts are back from Sand & Powder

I picked up my parts up today, everything looks great.
I went with the 100% Gloss,I hope i don't regret it. So far I like it. 


Monday, August 30, 2010

Carb Is In the house

Woot! I got my Carburetor and Air Filter in today. Now i just have to wait for the engine casing to come back from sandblasting  


OH yea look what i found today.
This Looks BA (Bad Ass)
I don't have the money for it right now, but I had to share. 

Friday, August 27, 2010

New Parts Ordered, w00t!


Well Google finally decided to cut me a check for my Adsense account, which means more goodies for the Mag.
So Thanx to TreatLand.tv I ordered a
Dellorto PHBG 19mm black race carburetor
32mm black foam air filter
E50 Clutch Bushing
I also scheduled the power coating of my frame and wheels. Hopefully those parts will be finished mid next week.

Wednesday, August 25, 2010

Parts Ready For Sand Blasting

I"m sending my frame, forks, engine casing and wheels off to be sandblasted. I'm hoping my wheels still look safe after all the rust is removed :). I still haven't decided if i'm going to paint the frame and forks or have someone else do them.
Thursday, August 12, 2010

New Used Shocks Have Arrived.

Got my new shocks in, the yellow will be painted black or Puch green I haven't decided.

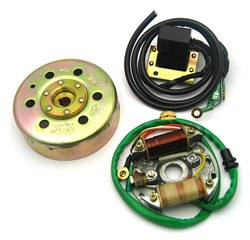
New CDI is in the house

I bought a CDI Adventure Pack from http://www.treatland.tv
Now the only thing left is the carburetor and the engine will be complete :)